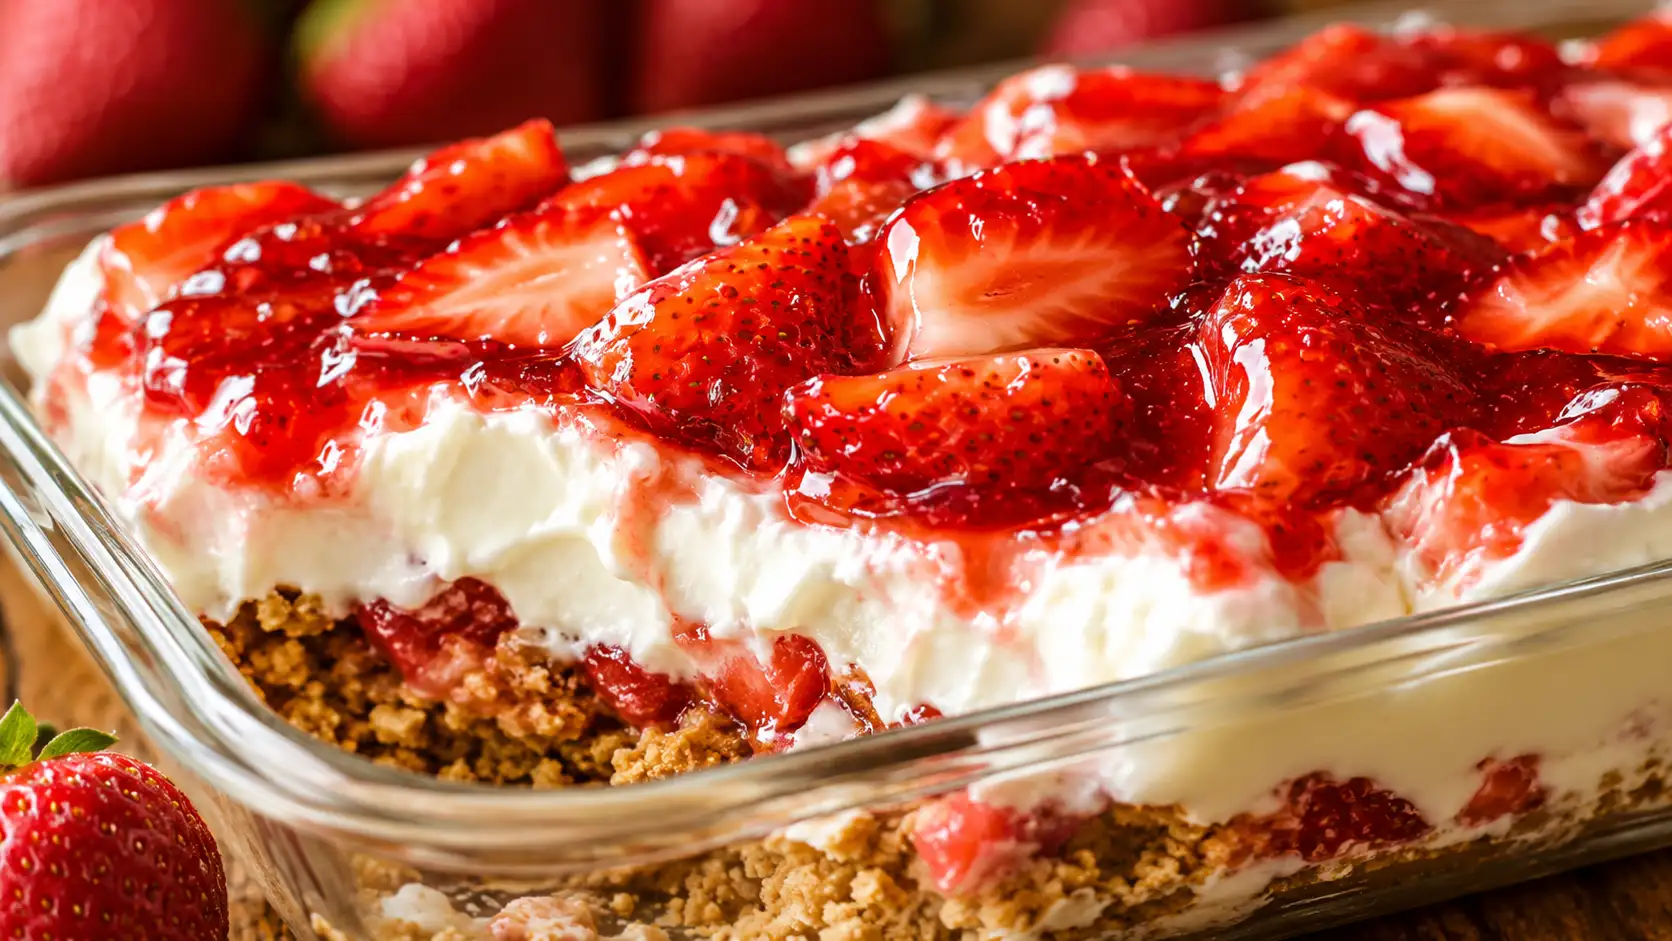
Honey-Glazed Strawberries • Whipped Cheesecake Cream • Buttery Cookie Crunch • No Oven Required
Nora Piket has made a great many desserts for AstroRecipes’ Seasonal Joy collection — celebration cakes, festive bakes, slow-chilled pies that take patience and planning. But every spring and summer, the recipe that arrives at the table and disappears fastest is never the most complicated one. It is always something like this: a strawberry cheesecake crunch cup, assembled in four layers, served cold, eaten with a spoon, and finished before anyone has the chance to ask what is in it.
The name is accurate and complete. Fresh strawberries macerated in honey, maple syrup, and lemon juice until glossy and juicy. A whipped cheesecake cream made from softened cream cheese, honey, and vanilla folded with whipped cream until cloud-light. A buttery crunch base of crushed graham crackers or butter cookies pressed into the bottom of each cup. Layered. Chilled. Served cold with extra strawberry syrup drizzled over the top.
It is the kind of dessert that requires no oven, no specialist equipment, and no technique beyond a hand mixer and a rubber spatula. It takes fifteen minutes to assemble and one hour in the refrigerator to set. And it produces something that looks and tastes like significantly more effort than it contains — the very best kind of recipe.
Extra chilled and firm from the fridge, or slightly soft and creamy at room temperature? That, as always, is a matter of personal conviction. Both answers are correct. Both deserve a second cup.
Table of Contents
Why This Strawberry Cheesecake Crunch Cup Wins Every Time
- No baking required — not a single minute of oven time. This is a pure assembly-and-chill dessert that is genuinely achievable for any skill level.
- The three-component architecture — crunch base, cheesecake cream, strawberry topping — produces a textural experience that no single-layer dessert can match. Every spoonful has all three.
- Honey and maple syrup macerate the strawberries into something more beautiful than fresh fruit alone — glossy, fragrant, and surrounded by a natural syrup that pools at the top of each cup like a glaze.
- The cheesecake cream is lighter than a traditional cheesecake filling but richer than whipped cream alone — the correct middle ground between indulgent and delicate.
- It serves 4 individual portions, which means no slicing, no sharing plates, no uneven pieces. Every guest gets their own perfect cup.
- It can be made up to 24 hours ahead — which makes it the ideal make-ahead dessert for dinner parties, summer gatherings, and any occasion where the day-of kitchen time needs to be free.
The Three-Layer Architecture — Why Each Part Matters
The Crunch Base
The foundation of the strawberry cheesecake crunch cup is a pressed crust of crushed graham crackers or butter cookies combined with melted butter and maple syrup. This is not a decorative addition — it is the structural and textural anchor of the entire dessert. Without it, the cup is a creamy strawberry mousse. With it, every spoonful contains a layer of golden, buttery crunch that contrasts directly with the soft cream and the juicy fruit above it.
Graham crackers produce a slightly more neutral, honeyed crumb — the classic American cheesecake crust flavour. Butter cookies (digestives in the UK, or any good shortbread-style biscuit) produce a richer, more buttery crunch with a finer texture. Both are excellent. The choice depends on what you have and how buttery you want the base to taste. Either way, do not skip the maple syrup — it binds the crumble slightly and adds a warmth to the base that plain butter alone cannot replicate.
The Cheesecake Cream
This is a no-bake cheesecake filling in individual form — cream cheese beaten smooth with honey and vanilla, then folded with whipped cream until the mixture is light, airy, and stable enough to hold its shape when spooned. The cream cheese provides the signature tang and body of a classic cheesecake. The honey sweetens without the sharpness of refined sugar. The whipped cream lightens the whole thing to a texture that sits somewhere between mousse and thick frosting — rich without being heavy, light without being insubstantial.
The most important technique here is the fold: the whipped cream must be folded into the cream cheese mixture — never beaten or stirred vigorously — to preserve the air that makes the filling light. A rubber spatula, slow strokes from the bottom of the bowl upward, until no white streaks remain. This takes patience but produces a result that is visibly different from a rushed mixture.
The Strawberry Topping
Macerated strawberries are one of the small miracles of simple cooking. Sliced fresh strawberries combined with honey, maple syrup, and a squeeze of lemon juice and left to sit for ten minutes produce something entirely different from the fruit you started with. The salt draws moisture from the berries; the honey and maple syrup create a glossy, fragrant syrup; the lemon juice brightens everything. The result is juicy, almost jammy strawberries surrounded by a pool of natural syrup that is genuinely better than anything that comes from a bottle.
The ten-minute maceration time is not optional. It is what transforms raw sliced strawberries into the glossy, syrup-soaked topping that makes this dessert look as good as it tastes.
Ingredients
Serves 4 | Prep: 15 min | Chill: 1 hour | Total: 1 hr 15 min | No baking required
For the Strawberry Topping:
- 2 cups fresh strawberries, hulled and sliced — about 300g
- 2 tablespoons honey — raw or clover
- 1 tablespoon pure maple syrup
- 1 teaspoon fresh lemon juice
- Optional: ½ teaspoon vanilla extract for a deeper berry flavour
For the Cheesecake Cream:
- 8 oz (225g) full-fat cream cheese, softened to room temperature — not light or reduced fat
- 1 cup (240ml) heavy whipping cream, whipped to soft peaks
- 2 tablespoons honey
- 1 teaspoon pure vanilla extract
- Optional: 1 tablespoon fresh lemon zest for brightness
For the Crunch Base:
- 1½ cups crushed graham crackers or butter cookies — about 150g
- 3 tablespoons unsalted butter, melted
- 1 tablespoon pure maple syrup
- Optional: a pinch of fine salt to balance the sweetness
To Finish:
- Extra strawberry syrup from the maceration bowl — spooned generously over the top
- A few whole or halved strawberries for garnish
- Optional: a few fresh mint leaves for colour
- Optional: a light dusting of powdered sugar for a delicate finish
How to Make Strawberry Cheesecake Crunch Cups — Step by Step

Step 1 — Macerate the Strawberries
Begin with the strawberries — they need the full ten minutes to macerate and should be the first thing you prepare. Hull and slice the strawberries into pieces of roughly equal thickness — about half a centimetre. Place them in a bowl and add the honey, maple syrup, and lemon juice. Stir gently to coat all the fruit, then set aside at room temperature for at least 10 minutes. During this time, the berries will release their juices and the honey and maple syrup will combine with them into a glossy, fragrant syrup. Do not refrigerate during maceration — the cold slows the process significantly.
Step 2 — Make the Crunch Base
Crush the graham crackers or butter cookies into fine crumbs. The most reliable method is to place them in a zip-lock bag and roll with a rolling pin — this gives you control over the texture. You want mostly fine crumbs with a few slightly larger pieces for texture variation. Combine the crumbs with the melted butter and maple syrup in a bowl and mix with a fork until every crumb is coated and the mixture holds together when pressed between your fingers. Add the pinch of salt if using — it makes the base taste more complex and less one-dimensionally sweet.
Divide the crumb mixture evenly among 4 serving cups, glasses, or small dessert dishes. Press the mixture firmly into the bottom of each cup using the back of a spoon or the bottom of a smaller glass. The base should be approximately 1 cm deep and uniformly pressed — this is what gives it the satisfying crunch when the spoon breaks through. Refrigerate the cups while you prepare the cream.
Step 3 — Make the Cheesecake Cream
In a large bowl, beat the room-temperature cream cheese with the honey and vanilla extract using an electric hand mixer on medium speed for 2 to 3 minutes until the mixture is completely smooth, pale, and free of any lumps. This step is the foundation of the filling’s texture — cream cheese that is not fully softened will not beat smooth and will leave lumps in the final cream. If your cream cheese is too cold, the lumps cannot be beaten out at this stage.
If you have not already done so, whip the heavy cream to soft peaks — the point at which the cream holds a shape but the peak folds over gently when the whisk is lifted. Do not overwhip to stiff peaks; the cream needs to fold into the cheese mixture smoothly.
Add the whipped cream to the cream cheese mixture and fold gently with a rubber spatula using slow, deliberate strokes from the bottom of the bowl up and over the top. Rotate the bowl as you go. Continue folding until no white streaks remain, but stop the moment the filling is uniform — overfolding deflates the air that makes the cream light. The finished cheesecake cream should be thick, smooth, and hold its shape when spooned.
Step 4 — Layer the Dessert
Remove the cups from the refrigerator. Spoon a generous, even layer of cheesecake cream over each crunch base — approximately half of the total cream per cup if making 4 portions. Use the back of the spoon to smooth it to the edges of the cup, covering the crunch base completely. The cream layer should be thick — at least 2 to 3 cm — this is a generous dessert, not a delicate one.
Spoon the macerated strawberries evenly over each cup, distributing both the fruit and the syrup that has accumulated in the bowl. The syrup should pool visibly at the surface of the strawberries — this is the glossy finish that makes the dessert look as beautiful as it tastes. Reserve a small amount of syrup to drizzle over the top just before serving.
Step 5 — Chill and Serve
Cover each cup loosely with plastic wrap — do not press the wrap onto the surface of the strawberries — and refrigerate for a minimum of 1 hour. This chill time allows the cream to firm slightly, the crunch base to hold its structure, and the strawberry syrup to settle through the layers. Two hours produces a better-set result. Overnight is excellent.
Serve directly from the refrigerator for the firmest, most structured result — the cream will be cold and set, the crunch base will retain its texture, and the strawberry topping will be glossy and slightly jellied. Or allow the cups to sit at room temperature for 10 to 15 minutes for a softer, creamier experience where the cream begins to loosen slightly and the whole dessert feels more like a cold mousse. Both versions are correct. Drizzle the reserved strawberry syrup over the top at the table for a glossy, restaurant-style finish.
Tips for Strawberry Cheesecake Crunch Cups That Look and Taste Perfect
Cream cheese must be at room temperature. Take it out of the refrigerator 45 minutes to 1 hour before starting. Cold cream cheese will not beat smooth — the lumps cannot be fixed at any later stage in the recipe. This is the single most important preparation step.
Don’t rush the maceration. Ten minutes at a minimum — fifteen is better. The berries need time to release their juices and the honey needs time to dissolve into the syrup. Strawberries that haven’t been macerated long enough will sit dry and separate on top of the cream rather than pooling with their own glossy sauce.
Choose ripe strawberries. Maceration amplifies what is already there — a ripe, fragrant, deeply coloured strawberry becomes extraordinary. A pale, tasteless, out-of-season berry becomes a pale, tasteless, glossy berry. Smell the strawberries before buying. If they smell of nothing, they will taste of nothing.
Use serving glasses for the best visual impact. A tall, clear glass or a wide-mouth mason jar allows the three distinct layers — golden crunch, white cream, red berries — to be seen from the side. This is a beautiful dessert and it deserves a vessel that shows it off.
Press the base firmly. A loosely packed crunch base will crumble the moment a spoon touches it. Press it with the bottom of a glass or the back of a spoon with real pressure until it holds together as a solid layer. It should feel like a pressed pie crust, not loose sand.
Add the fresh strawberry garnish just before serving. Strawberries placed on top more than 30 minutes before serving will release further juice and begin to look tired. Add the garnish at the table for maximum freshness and visual impact.
Extra Chilled or Slightly Soft and Creamy — The Great Debate
With strawberry cheesecake crunch cups, the temperature at serving is genuinely a stylistic choice — and one worth making consciously rather than by default.
Extra chilled, straight from the refrigerator: the cheesecake cream is firm and cold, holding its shape cleanly when the spoon cuts through it. The crunch base has its maximum texture — pressed and firm, breaking with a satisfying crack under the spoon. The strawberries are cold and glossy, the syrup slightly thickened by the refrigerator temperature. This is the version for people who love clean textures and precise layers, for dinner party presentations where the dessert needs to look exactly as it did when plated, and for summer afternoons when cold is the priority.
Slightly soft and creamy, after 10 to 15 minutes at room temperature: the cheesecake cream loosens slightly and becomes more mousse-like — less structured, more yielding. The crunch base softens at the edges where the cream has sat against it overnight. The strawberry syrup becomes more liquid and flows more freely when spooned. This version eats more like a layered mousse than a composed dessert — each component less distinct, more integrated. It is arguably more flavourful — cold suppresses some of the honey and vanilla notes that bloom more fully at room temperature.
Nora Piket’s verdict: serve it cold the first time. Then eat the second cup fifteen minutes later and notice the difference. The colder version is more impressive. The softer version is more delicious. The correct answer is to make enough cups to have both experiences.
Variations Worth Making
Mixed Berry Cheesecake Crunch Cups: Use a combination of strawberries, raspberries, and blueberries in equal parts. The raspberries add tartness, the blueberries add sweetness and colour. Macerate all together with the same honey-maple-lemon mixture. The mixed berry syrup that forms is a deep rose-purple and looks extraordinary against the white cheesecake cream.
Lemon Cheesecake Crunch Cups: Add the zest of one lemon and a tablespoon of fresh lemon juice to the cheesecake cream. Use lemon curd — 2 tablespoons — stirred through the strawberry topping instead of the maple syrup for a sharper, more citrus-forward flavour. Top with thin lemon slices alongside the strawberries. A brighter, more elegant version.
Chocolate Base Version: Replace the graham cracker crunch base with crushed chocolate cookies — Oreos (filling removed), chocolate digestives, or any dark chocolate biscuit. The bittersweet chocolate against the sweet cream and berry topping is a combination that feels more grown-up and works particularly well for an evening dinner party dessert.
Mango and Passion Fruit Cups: Replace the strawberries with diced ripe mango and sweeten with honey and a tablespoon of passion fruit juice. The tropical fruit maceration is fragrant and vibrant. Add a pinch of chilli flakes to the mango topping for a heat note that complements the sweet cream in a genuinely surprising way.
Frozen Strawberry Cheesecake Cups: After assembling, cover and freeze for 2 to 3 hours instead of refrigerating. The cheesecake cream firms to an ice-cream-like texture and the strawberry topping sets slightly into a sorbet consistency. Remove from the freezer 10 minutes before serving. A different dessert entirely — and a spectacular one for a July afternoon.
How to Serve Strawberry Cheesecake Crunch Cups
- In clear glasses or wide mason jars where the three layers are fully visible — the most impressive and most correct presentation
- Straight from the refrigerator with a long dessert spoon that reaches all three layers in one scoop — the defining eating experience
- With extra macerated strawberry syrup served in a small pitcher at the table — for those who want more
- As individual portions at a dinner party — elegant, self-contained, requiring no slicing or serving
- At a garden party, picnic, or summer celebration where individual cups are easier to handle than a sliced dessert
- The next morning for breakfast with a drizzle of extra honey — not traditional, not wrong, and entirely Nora Piket approved
Storage & Make-Ahead
Strawberry cheesecake crunch cups keep well in the refrigerator for up to 24 hours. Beyond that, the crunch base begins to absorb moisture from the cream and loses its textural contrast — it will still taste good but will feel more like a soft, integrated layer than a distinct crunch. For maximum crunch, serve within 12 hours of assembly.
Make-ahead strategy: prepare the three components separately and refrigerate. Keep the crunch base mixture in a covered container at room temperature (or refrigerate for up to 2 days). Keep the cheesecake cream in a covered bowl in the refrigerator for up to 2 days — it may need a brief re-fold before using. Keep the macerated strawberries refrigerated for up to 24 hours (they will continue to release juice, which is not a problem). Assemble the cups no more than 2 to 3 hours before serving for the best balance of set cream and fresh crunch.
Do not freeze the assembled cups for extended periods — the cream texture changes significantly after thawing. The 2 to 3 hour partial freeze for the Frozen Strawberry Cup variation is different from long-term freezing and is specifically designed as an alternative serving method.
Why This Belongs in Seasonal Joy
Seasonal Joy, as a collection, celebrates the desserts that belong to a specific moment in time — a season, a celebration, a particular kind of afternoon. Karpatka belongs to winter. The cream cheese lemonade pie belongs to the height of summer. And this strawberry cheesecake crunch cup belongs to the exact moment when the first truly good strawberries of the season appear — late spring to early summer, when the berries are finally fragrant and sweet and red all the way through rather than pale and hollow at the centre.
Nora Piket always says that the best seasonal desserts are not just food — they are proof that the season has arrived. One bite of a perfectly macerated strawberry in honey and maple syrup over cold cheesecake cream is all the confirmation you need that summer is here. It is the kind of dessert that does not need a special occasion to justify making. It is the occasion.
Would the North or the South finish this first? The honest answer is that no one is waiting to find out. The cups disappear before the question is settled.
A Final Word from the Seasonal Joy Kitchen
There is a particular pleasure in a dessert that asks very little and delivers very much. Fifteen minutes of preparation. One hour of patience. And then four cups sitting on a refrigerator shelf that look — in their clear glasses, with their distinct layers of gold and white and red — exactly like something that required the whole afternoon.
That gap between effort and impression is the heart of the strawberry cheesecake crunch cup. It is the kind of recipe that earns the compliments it receives without the cook having to confess how easy it actually was. Nora Piket believes this is a completely legitimate approach to dessert. Make it beautiful. Make it delicious. Let people believe it took longer than it did.
They will ask for the recipe regardless. Share it generously.
More seasonal recipes worth savoring — timeless family classics, grandmother’s kitchen secrets, and Nora Piket’s own take on the desserts that define every season. Follow us on AstroRecipes and never miss a recipe.
Recipes I Think You’ll Love