You remember the first bite—the soft center, the faint crisp at the edge, and the way the holiday room smelled warm and buttery.
This recipe was built so you can recreate that feeling in about ten to twelve minutes per batch. It is a no-chill method, so you mix, portion, and bake right away on parchment-lined sheets at 350°F for consistent results.
Cool butter should be around 67°F to keep spread minimal, and rolling each dough ball in granulated crystals gives a sparkly, crinkled top that looks like a bakery treat.
You’ll get clear steps on ingredients, dough handling, and decoration with frosting so your cookies stay tender and bake evenly. Store baked goods at room temperature for up to three days, or freeze pre-portioned dough for later holiday baking.
Classic Christmas Sugar Cookies
Equipment
- hand or stand mixer
- Mixing Bowls
- Measuring cups and spoons
- cookie scoop (3 tbsp)
- light-colored baking sheet
- Parchment Paper
- cooling rack
Ingredients
- 2 ¾ cups all-purpose flour
- 1 cup unsalted butter (cool room temperature, ~67°F)
- 1 ¼ cups granulated sugar (plus more for rolling)
- 1 large egg
- 2 tsp vanilla extract
- 1 tsp baking powder
- ½ tsp baking soda
- ½ tsp salt
Instructions
- Preheat oven to 350°F and line baking sheets with parchment paper. Let butter reach cool room temperature (~67°F).
- Cream butter and sugar using a hand or stand mixer on medium speed for 1–3 minutes until light and fluffy.
- Beat in the egg and vanilla. Scrape the sides of the bowl to ensure a uniform mix.
- In a separate bowl, whisk flour, baking powder, baking soda, and salt. Slowly add to wet ingredients, mixing just until combined.
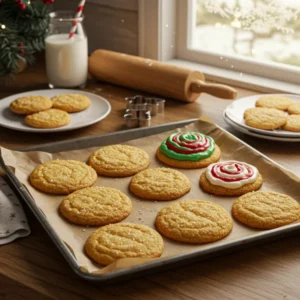
- Portion dough using a 3-tablespoon scoop. Roll each ball in granulated sugar and place 2 inches apart on baking sheets.
- Bake for 10–12 minutes until edges are set. Centers should appear soft. Do not overbake.
- Cool on baking sheet for 5 minutes, then transfer to a wire rack to finish cooling.
- Once cool, enjoy plain or decorate with frosting or colored sugar if desired.
Notes
Nutrition
Table of Contents
Why You’ll Love These Classic Christmas Sugar Cookies
This no-chill approach gets you from countertop to oven fast while keeping the interior tender and the edges just set. You’ll notice reliable shape and consistent color when you use cool, room-temperature butter at about 67°F.
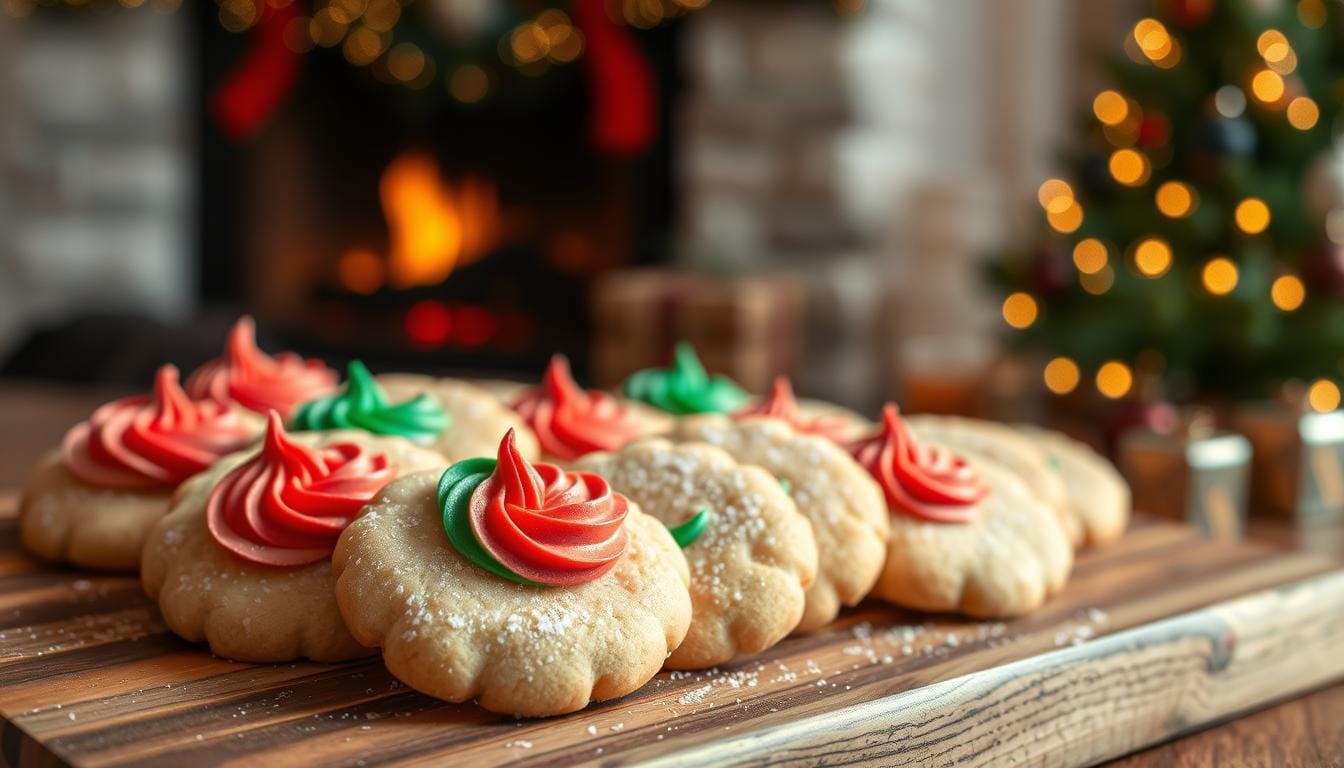
Texture is the star: a soft center, a gentle chew, and lightly crisp rims that avoid a dry, cakey result. A quick roll in granulated sugar creates a sparkly shell and encourages crinkled tops.
The recipe uses pantry staples—butter, vanilla extract, and plain flour—so you can scale batches for gifts or swaps. A simple mixing routine works with either a hand mixer or stand mixer, so you can choose the tool you have.
- Ready in minutes—no chilling required.
- Easy to decorate: leave plain or add smooth frosting.
- Follow the bake cue: 350°F for 10–12 minutes until edges are set; don’t overbake to keep centers soft.
Ingredients and Tools You’ll Need
Gathering the right pantry staples and tools before you start keeps the bake smooth and the timing predictable. Lay everything out so measuring and mixing move without a pause.
Core ingredients
You’ll need all-purpose flour, granulated sugar, unsalted butter at cool room temperature (~67°F), an egg, vanilla extract, baking powder, baking soda, and salt. We recommend weighing flour for accuracy and keeping teaspoon and cup measures nearby.
Helpful tools
- Hand or stand mixer to cream butter and sugar until light and fluffy.
- Mixing bowls roomy enough to scrape sides and prevent dry pockets.
- A light-colored aluminum baking sheet lined with parchment paper — skip spray to avoid excess spread.
- A 3-tablespoon cookie scoop for uniform dough balls and even baking.

Step-by-Step: Bake Perfect Sugar Cookies Every Time
Start by preheating the oven to 350°F and set your butter out to reach a cool room temperature. Line each baking sheet with parchment so every batch bakes evenly and releases cleanly.
Cream the butter and sugar on medium speed for 1–3 minutes until pale and fluffy. Beat in the egg and vanilla extract, then pause to scrape sides of the bowl so the mix is uniform.
Whisk flour, baking powder, baking soda, and salt in a separate bowl. Add the dry mix on low and stir just until a soft dough forms; overmixing will toughen the cookie dough.

Portion with a 3-tablespoon scoop, roll each mound in granulated sugar, and place on the parchment-lined baking sheet about 2 inches apart. A light press with the bottom of a cup is optional.
- Bake for 10–12 minutes. Pull trays when edges are set and slightly colored; centers may still look soft.
- Cool on the sheet for 5 minutes, then transfer to a rack so bottoms stay tender.
- When fully cool, add frosting or enjoy plain.
Tips for Soft and Chewy Sugar Cookies
Mastering a couple of small steps lets you choose fast no-chill bakes or richer, chilled dough for thicker results.
No-chill convenience: Bake right after mixing for quick sugar cookies that stay tender. If you prefer a thicker, chewier result, chill portioned dough 24–72 hours; the extra time deepens flavor and limits spread.
Butter and temperature
Keep butter at about 67°F so rounds hold shape and edges set nicely. If your kitchen runs warm, pop scooped dough into the fridge for 10–20 minutes before baking to keep sizes uniform.
Leavening and texture
Granulated sugar, baking powder, and baking soda work together to build soft centers and slightly chewy rims. Fresh baking powder gives lift and encourages crinkly tops.
Finishing moves
- Roll each ball in sugar before baking; the surface dries and cracks as the cookie expands.
- Measure flour accurately—too much makes the dough dry and prevents ideal spread.
- Pull trays when the edges set; centers will firm while cooling for the perfect bite.
“A light hand when mixing and fresh leavening are the fastest routes to consistent results.”
Frosting and Decorating Ideas for Every Holiday
Simple frostings and a few smart tricks will turn plain rounds into festive favorites.

Choose a base: American buttercream gives a smooth, pipeable finish and takes gel color well. Cream cheese frosting adds a tangy, plush contrast that pairs nicely with the buttery crumb.
Color before or after you mix. Work in a mixing bowl and add gel colors in tiny amounts to control hue. A touch of vanilla extract brightens both frostings without overpowering the cookie.
- Roll cookie dough in colored sugar or jimmies for a no-frost sparkle straight from the oven.
- Keep decorations light so the soft bite and delicate edges stay intact.
- Use a slightly larger size cookie (about 3 tablespoons of dough) for ultra-soft centers that hold frosting well.
“Let your decorations highlight the classic flavor—frost some, leave some plain.”
| Frosting | Texture | Best Use |
|---|---|---|
| American buttercream | Smooth, pipeable | Bright colors; piping details |
| Cream cheese | Soft, tangy | Plush finish; pairs with rich dough |
| No-frost (colored sugar) | Crisp sparkle | Quick, oven-ready festive look |
Storage, Freezing, and Make-Ahead Strategy
Storing and freezing the dough correctly saves time and keeps texture intact. A few small steps will help your batch stay soft and ready for frosting or gifting.
Room-temperature storage: Once fully cooled, place your sugar cookies in an airtight container at room temperature for up to three days. Add a thin slice of bread, a small tortilla, or an apple wedge to the container to keep moisture without changing flavor.
Freeze pre-portioned dough for quick bakes
Portion cookie dough into balls, freeze them uncoated in a sealed bag, and label with the date and bake minutes. When you want fresh batches, let the dough warm briefly, roll in sugar just before placing on a parchment-lined baking sheet, then bake as directed.
Optional chill window for richer flavor
Chill dough 24–72 hours to deepen flavor and reduce spread. This extra time yields a slightly thicker, chewier result and can be used as a deliberate make-ahead step during busy holidays.
- Keep parchment paper and a baking sheet nearby to move frozen portions quickly to the oven.
- Store frosted layers separated by parchment to prevent sticking and preserve decorations.
- Avoid large temperature swings in storage—steady room temperature preserves texture best.
“Label frozen dough with date and minutes to bake so you can manage timing easily during busy holiday weeks.”
Sugar Cookies: Pro Techniques, Pans, and Parchment
Small gear choices — pans, paper, and portioning — change how your batch browns and keeps a soft center.
Measure flour for proper spread
Weigh flour when possible. Scooping dry cups can add too much flour and make the dough dense. Too much flour limits spread and dries the interior.
Pick the right baking sheet
Use a light-colored aluminum baking sheet for even browning. Dark pans heat faster and can toughen bottoms. Rotate sheets halfway through if your oven has hot spots.
Why parchment paper beats silicone
Line trays with parchment paper rather than using nonstick spray or silicone mats. Parchment helps control spread and releases cleanly without extra oil.
Portioning and scoop size
A cookie scoop gives uniform rounds and steady bake times. A 3-tablespoon scoop yields a larger size cookie that bakes with ultra-soft centers while edges set in the minutes on the tray.
- Pre-cut parchment for quick sheet changes.
- Keep room temperature butter and dough steady to avoid over-spread.
- Check fresh baking powder to support rise and crackle.
Conclusion
Pull trays when edges are set and centers still look soft so your sugar cookies finish tender while rims hold a gentle chew. This quick no-chill method—bake at 350°F on parchment-lined, light-colored sheets—gives consistent results every batch.
Keep butter cool, measure flour accurately, and roll each ball in granulated sugar for that classic crinkled top. The balanced dough and a touch of vanilla or extract let the buttery flavor shine whether you frost or leave them plain.
Store cooled cookies airtight or freeze portioned dough to bake fresh later. Save this post as your holiday guide and enjoy sharing warm treats with family and friends.
“Take a behind-the-scenes look at what we’re cooking up—follow us on Facebook at https://www.facebook.com/astrorecipes1.”