You remembered the hush in the room the year you carved that centerpiece — the scent of hot beef and browned fat, the soft clink of forks. You wanted the main dish to be effortless and unforgettable. This guide shows how a tender, richly marbled prime rib can deliver just that.
You’ll rely on a meat thermometer to stop guessing and to protect your investment. Bring the meat to room temperature 30–60 minutes before cooking so the internal temperature climbs evenly in the oven.
Plan a quick 15‑minute prep, an hour of cook time and a deliberate rest so slices stay rosy and juicy. The yield serves about 12, and the leftovers chill well in the refrigerator for easy next‑day sandwiches.
You’ll set the tone for a festive menu with classic sides like potatoes and Brussels sprouts. With clear timing, steady technique, and a calm pace, you’ll carve with confidence and savor holiday success.
Holiday Prime Rib Roast
Equipment
- roasting pan with rack
- Digital Meat Thermometer
- cast iron skillet (optional for sear)
- Cutting Board
- Carving Knife
Ingredients
- 5–7 lb prime rib roast, bone-in or boneless
- 2–3 tbsp kosher salt
- 1 tbsp freshly cracked black pepper
- 6 cloves garlic, minced
- 2 tbsp fresh rosemary, chopped
- 1 tbsp fresh thyme, chopped
- 2 tbsp olive oil
- 1 cup beef broth (for optional au jus or gravy)
Instructions
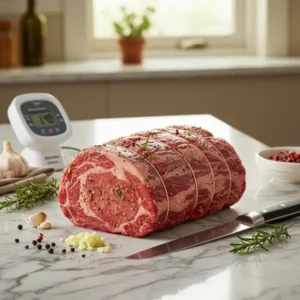
- Remove the roast from the refrigerator 30–60 minutes before cooking to bring to room temperature. Pat dry with paper towels.
- Mix kosher salt, pepper, minced garlic, rosemary, thyme, and olive oil into a paste. Rub evenly over the entire roast, pressing to adhere.
- Place the roast fat-side up on a rack inside a roasting pan. Insert a digital thermometer into the thickest part of the meat.
- Option A: Sear all sides in a hot cast iron skillet with 2 tbsp oil, then roast at 500°F for 20–30 minutes.
- Reduce oven to 300°F and roast until internal temperature reaches 125°F for medium-rare, or follow no-peek method: 5 min per lb at 500°F, turn off oven, and coast to doneness without opening the door.
- Remove from oven, tent loosely with foil, and let rest 20–30 minutes. Carryover cooking will raise internal temp by ~5–10°F.
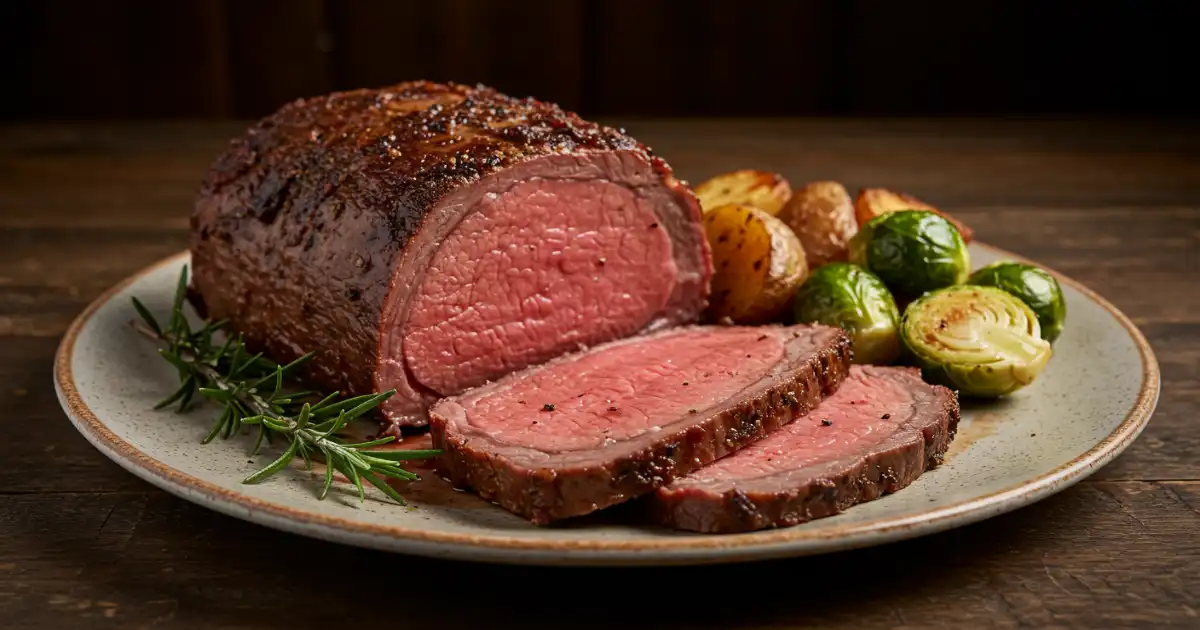
- Slice across the grain to desired thickness. Serve immediately with au jus or horseradish sauce.
Notes
Nutrition
Table of Contents
Why a Prime Rib Roast Makes the Ultimate Christmas Centerpiece
A single, perfectly cooked joint can lift the whole meal with deep beef flavor and silky fat. This cut is prized for extreme tenderness and the marbling that bastes the meat from the inside as it cooks.
Simple technique, spectacular results. With a brief seasoning, a hot start in the oven, and steady attention to internal temperature, you can produce a glossy crust and a rosy center that guests admire.
Bring the roast to room temperature for 30–60 minutes before you cook. This step evens the heat so you avoid a gray band and a chilled core.
Why it works for home cooks
- You rely on a meat thermometer, not guesswork, to hit your target doneness.
- Minimal gear and basic pantry seasonings deliver restaurant-style flavor.
- The method scales easily for bone-in or boneless, feeding small or large gatherings.
- Serve with rich sides—potatoes, mushrooms, and greens—to balance the meat.
| Feature | Bone-in | Boneless |
|---|---|---|
| Flavor | Added depth from bone | Even slices, easier carving |
| Cooking | Slightly longer, steady oven heat | Faster, more uniform temp |
| Best use | Showpiece for large groups | Flexible for smaller meals |
Shopping, Sizing, and Selecting Your Rib Roast
A smart buy at the butcher sets the tone for an effortless holiday centerpiece.
Choose a well-marbled grade—ideally labeled prime rather than choice—for that buttery texture and steady fat that keeps slices juicy. Ask the butcher to cut and tie a bone-in piece; many will do this free and it helps with even cooking and easy carving.
Decide between bone-in and boneless based on presentation and carving. A bone-in prime rib adds flavor and bones for broth. Boneless is easier to slice and should sit on a wire rack so oven air circulates underneath.
- Plan 0.75–1 pound per person; use 1 pound if you want guaranteed leftovers.
- Confirm your roasting pan, rack, and meat thermometer fit the size you buy.
- Clear refrigerator space so the joint lies flat before you bring it to room temperature.
| Choice | Bone-in | Boneless |
|---|---|---|
| Flavor impact | Deeper, from bone and fat | Cleaner slices, less fuss |
| Cooking note | Insulates; may take longer | Needs rack; more even temp |
| Best for | Showpiece, broth use | Easy carving, small groups |
Essential Tools and Ingredients for Success
Set up your workspace so every tool and ingredient is within reach before you heat the oven. A small kit of reliable gear and simple seasonings makes the process smoother and protects your investment in a quality cut.
Thermometer and pan setup
Use a digital meat thermometer rated for 500°F. It lets you monitor internal temperature without opening the door and disrupting heat. Place the probe in the thickest part of the meat, away from bone.
Choose a sturdy roasting pan or a rimmed baking sheet fitted with a wire rack. The rack allows hot air to circulate so the joint cooks evenly.
Seasonings and extra items
- Salt and pepper: kosher salt for proper surface seasoning; fresh black pepper for bite.
- Aromatics: sliced or minced garlic, fresh rosemary, and thyme for depth.
- Oil: a little olive oil helps the rub adhere and promotes browning.
- Optional: butcher’s twine to maintain shape on a bone-in prime cut, and a heavy cast-iron skillet if you plan to sear first.
Sauces, board, and workflow
Pan drippings are modest with well-marbled beef. Keep beef broth or stock on hand to build au jus or a quick gravy.
Have a large cutting board ready for resting and carving. Confirm oven clearance so the roast sits on the center rack with room for consistent heat.
Prep: Room Temperature, Trimming, and Tying
Set aside time before you heat the oven so the joint warms evenly and cooks predictably.
Bring the roast out 30–60 minutes before cooking so the center can catch up with the exterior. A short warm-up reduces the gray band and helps you get a uniform pink throughout. If you prefer a longer salt rest, plan up to four hours at room temperature for extra flavor and evenness.
Pat the meat dry with paper towels before seasoning. Drying the surface helps salt and herbs stick and promotes a brown, savory crust when the heat hits.
- Trim only excess loose fat; keep the fat cap to self-baste the joint as it cooks.
- Tie the cut if its shape is uneven—this keeps slices attractive and the cook time predictable.
- Arrange the rack so the fat side faces up; rendered fat will baste the meat.
- Leave clearance around the pan so hot air circulates without crowding the joint.
Set up a simple seasoning station with kosher salt, fresh black pepper, garlic, rosemary, and thyme so you can rub the surface without stopping. A butcher-cut-and-tied bone-in piece saves you trimming time and helps the joint hold shape during the final sear and roast.

| Prep Step | Why it matters | Timing |
|---|---|---|
| Bring to room | Even cooking, reduced gray band | 30–60 minutes (or up to 4 hours with salt rest) |
| Pat dry & season | Better crust and flavor adhesion | 5–10 minutes |
| Trim & tie | Maintain shape and even cook | 10–15 minutes |
| Rack orientation | Fat side up bastes meat naturally | Before oven |
Prime Rib Roast
Make a concentrated herb-garlic paste that clings to the meat and forms a glossy crust. You’ll mix kosher salt, crushed peppercorns, chopped rosemary, thyme, and lots of minced garlic. Add a splash of olive oil so the rub adheres and browns evenly.
Work systematically: score the fat cap and, if your loin is very large, consider cutting it in half so minutes in the oven are predictable. Slide thin garlic slices into small slits across the top to infuse the interior as it heats.
Coat every side thoroughly so seasoning reaches the ends and center of each slice. Position the cut fat side up so rendered fat bastes the meat, and set the joint on a rack for steady airflow whether you choose bone-in prime rib or boneless.
- Apply the rub evenly and press it into the surface.
- Trim only excess fat; keep the cap that self-bastes.
- Plan your cut orientation now so slices are even and easy to serve later.
Step-by-Step: Sear, Roast, and Rest
Begin at very high heat to trigger Maillard browning, then finish gently for an even cook. This two-stage approach gives you a deep, savory crust and a uniform center without guesswork.
Insert a digital thermometer probe into the thickest part of the meat before it goes into the oven. That lets you track degrees without opening the door and losing heat.
High-heat start at 500°F for a charred, savory crust
Sear first if you choose Method A: preheat a heavy cast-iron skillet with 2 tbsp olive oil until smoking hot. Brown all sides until deep golden, then transfer the joint to a rack and roast at 500°F for 20–30 minutes.
Low-and-slow finish: using your oven and thermometer the right way
After the high-heat phase, either reduce the oven to 300°F and roast until the thermometer reads about 125°F for rare/medium-rare, or follow Method B: roast 5 minutes per pound at 500°F, then turn the oven off and keep the door closed for the coast to doneness.
Managing newer ovens with internal fans without opening the door
If your modern oven’s fan cools faster during the no-peek coasting, briefly bring it back to 500°F for a short burst, then turn it off and leave the door closed. Always watch the thermometer—degrees matter more than minutes.
Let the meat rest 20 minutes on a cutting board. Juices will redistribute and slices stay juicy. Collect modest drippings in the pan; supplement with beef broth for au jus or gravy.

| Step | What to do | Target |
|---|---|---|
| Sear | Cast iron, 2 tbsp olive oil, deep brown | 20–30 minutes at 500°F |
| Finish | Reduce to 300°F or use no-peek coast | Thermometer reads ~125°F (rare/medium-rare) |
| Rest | Remove to board, cover loosely | 20 minutes before carving |
Time and Temperature Guide for Your Preferred Doneness
A clear minutes-per-pound rule plus target temperatures keeps serving predictable.
Initial high heat: plan 5 minutes per pound at 500°F to build a deep crust. For example, 6 lb = 30 minutes; 9 lb = 45 minutes. After that blast you can turn the oven off and keep the door closed for a coast—about 2 hours often brings a medium-rare finish near 135°F for a bone-in prime piece.
Internal temperature targets
Use these final doneness ranges as your goal:
- Rare: 120–129°F
- Medium rare: 130–134°F
- Medium: 135–144°F
- Medium well: 145–154°F
- Well: 155–164°F
Carryover and pull points
Your meat thermometer is the final word. Pull 5–7°F below your target if you rest 10–15 minutes. If you plan a longer 20–25 minute rest, expect roughly a 20°F rise during carryover. Modern ovens with internal fans may cool faster; if the coast stalls, briefly bring the oven back to 500°F without opening the door, then turn it off and continue to monitor by degrees.
Use minutes, time, and temperature together. Treat the minutes-per-pound rule as a guide, but adjust by reading the thermometer so your slices hit the doneness you scheduled.
Resting, Slicing, and Serving the Roast
Give the joint a quiet, timed pause before you carve. After high heat and slow finishing, the meat needs at least 20 minutes to redistribute juices and relax the fibers. This step prevents a rush of fluids the moment you cut.
Tent loosely with foil and set a timer so the clock aligns with your final sides. While the piece rests, carryover will raise the internal temperature a few degrees, nudging you toward your target doneness.
Move the roast to a large cutting board. Catch the juices in a small pan or bowl to fold back into au jus or sauce.
How to slice and portion for guests
Carve across the grain into even slices. Choose thickness to match the crowd: thicker slabs for a plated dinner, thinner cuts for sandwiches later.
- Separate bones cleanly from a bone-in piece; save them for broth or present as a rustic garnish.
- Serve center slices to diners who want redder meat, and reserve end cuts for guests who prefer more done pieces.
- Keep portions balanced so plates have room for sauce and sides without overcrowding the beef.
Save trimming and juices to enrich pan sauce or to spoon over slices when you serve. Plate and serve immediately after slicing to preserve heat and juiciness.
Horseradish Sauce, Au Jus, Gravy, and Holiday Side Dishes
Sauces, pan juices, and hot sides pulled from the oven tie the meal together. You’ll build flavor from the pan fond and a little extra broth, then finish sides while the meat rests so everything serves warm and bright.
Make a deep au jus: deglaze the roasting pan with a few cups of beef broth, scraping browned bits, then simmer and taste. Because drippings are modest, the broth gives body without watering down flavor.
Quick gravy: whisk pan juices with broth, add a spoon of fat or a small slurry, and simmer until silky. Adjust salt, garlic, and a splash of acid to balance the richness.
Horseradish sauce: stir grated horseradish into sour cream or crème fraîche with lemon, salt, and chives. The sharp bite cuts through fat and refreshes each bite.
Timing classic sides
Prep potatoes, mushrooms, and Brussels sprouts so they go into the hot oven while the joint rests (about 20–25 minutes). Use high heat to caramelize edges and finish tender centers.
For crisp results, toss vegetables with oil, garlic, and a touch of salt; roast on a single sheet so hot air circulates. Use cast-iron if you want a quick sear for mushrooms before finishing in the oven.
Wine and beer pairings
Wines: choose structured reds—Bordeaux, Cabernet Sauvignon, Syrah—or plusher options like Merlot and Malbec. They stand up to the meat’s crust and beefy flavors.
Beers: Brown Ale, Porter, Stout, or Amber Ale pair well with caramelized fat and a savory top crust.
| Item | Why it works | Timing/Tip |
|---|---|---|
| Au jus | Deep, savory moisture from deglazed pan and beef broth | Simmer 5–10 minutes; strain if desired |
| Horseradish sauce | Bright, sharp counterpoint to rich meat | Make ahead and chill; stir before serving |
| Roasted potatoes & sprouts | Caramelized edges, tender centers | 20–25 minutes at high heat while meat rests |
| Pairings | Wines and beers that match body and tannin | Offer one red and one beer option for variety |
Leftovers, Storage, and Reheating Without Drying Out
Treat leftovers like a treasure: store them with care so the flavor holds for days.
Keep the joint whole whenever you can. Place it in an airtight container or heavy-duty bag and refrigerate. Whole storage preserves moisture and your preferred doneness better than pre-slicing.
Plan to use the meat within 3–5 days in the refrigerator. Slice only what you need for immediate service and label portions with the date so nothing gets lost after a holiday rush.
Gently reheating to protect texture
Reheat low and slow. Warm slices in a low oven or steam briefly on the stovetop. Use a meat thermometer and pull when a few degrees below target—carryover will finish the job without drying.

Best next-day ideas
- Sandwiches with thin slices and horseradish mayo.
- Beef stroganoff or quick stew to stretch rich flavor.
- Steak pot pie using sturdy vegetables and reserved juices.
| Tip | Why it helps |
|---|---|
| Airtight storage | Keeps meat juicy and slows spoilage |
| Sweep juices into containers | Moistens reheated slices and sauces |
| Use thermometer | Protects doneness and prevents overcooking |
Conclusion
A clear plan and a steady thermometer turn a holiday prime rib roast into a repeatable triumph.
You’ll choose one of two reliable methods—a sear then slow finish or a 500°F no‑peek start—and follow the probe, not the clock. Resting protects the meat and keeps every slice juicy.
Size the joint at 0.75–1 pound per person so you get generous helpings and useful leftovers for sandwiches, stroganoff, or pot pie. Because drippings are modest, boost au jus or gravy with broth for full flavor.
Keep this simple routine bookmarked. With clear steps, temperature control, and sensible planning, your perfect prime centerpiece becomes an annual showpiece and a dependable path to holiday success.
FAQ
How should you choose the right bone-in rib for a holiday dinner?
When should you take the roast out of the refrigerator before cooking?
Do you need to tie the roast and why use butcher’s twine?
What is the best way to season the cut for maximum flavor?
Should you sear the outside before roasting, and at what temperature?
How do you use a meat thermometer to hit your desired doneness?
What is carryover cooking and how long should you let the roast rest?
How should you slice the roast for serving?
What can you do with limited pan drippings to make au jus or gravy?
How do you store and reheat leftovers without drying them out?
Can you roast the cut in a modern convection oven with a fan?
What sides pair best and how do you time them with the main roast?
“Curious about what’s happening behind the scenes? Follow our kitchen adventures and more on Facebook.”