The Sweet Story That Started It All
There’s something special about no-bake desserts that feels like culinary magic. You blend, chill, and a few hours later, a masterpiece emerges. For me, the Oreo mousse cake wasn’t just a dessert—it was a life-saver. It was my niece’s eighth birthday, and I had just found out the oven wasn’t working. No time for a bakery run, no backup plan. What I had? A family-sized pack of Oreos, heavy cream, cream cheese, and chocolate. With some improvisation and a lot of hope, I whipped together what would become my most-requested dessert for every family celebration.
This layered mousse cake was born out of chaos, but the outcome was so rich and velvety, I knew it had to become a staple. It wasn’t just the taste. It was how it made people pause mid-bite, eyes widening, asking, “Wait, you made this?” Over the years, I’ve made dozens of Oreo recipes—from simple Oreo milkshakes to my famous Oreo mud cake—but this mousse cake? It’s the one they always remember.
What I love most is how the cake balances indulgence with ease. Each layer adds a different texture, flavor, and depth, creating a complete sensory experience. And did I mention you don’t even need to turn on the oven? If you’re a fan of creamy chocolate cake or anything involving Oreo filling, this one’s going straight to your favorites.
Table of Contents
Oreo Mousse Cake (No-Bake)
Equipment
- 8-inch springform pan
- Mixing Bowls
- electric hand mixer or stand mixer
- Rubber spatula
- food processor
- Saucepan
- Whisk
- offset spatula (optional)
Ingredients
- 24 Oreo cookies (with filling)
- 5 tbsp unsalted butter, melted
- 200 g dark chocolate, chopped
- 1 cup heavy cream (cold), for mousse
- 225 g cream cheese, softened
- 1 tsp vanilla extract
- ⅓ cup powdered sugar
- ½ cup heavy cream (for ganache)
- 100 g dark chocolate, finely chopped (for ganache)
Instructions
- Crush Oreo cookies (with filling) in a food processor into fine crumbs. Mix with melted butter and press firmly into the bottom of an 8-inch springform pan. Chill while preparing the mousse.
- Melt 200g dark chocolate and let cool slightly. Whip 1 cup heavy cream to stiff peaks. In another bowl, beat cream cheese, vanilla, and powdered sugar until smooth.
- Fold the cooled chocolate into the cream cheese mixture. Gently fold in whipped cream until combined. Spread over crust and smooth the top. Chill for 2 hours.
- Heat 1/2 cup heavy cream until just simmering. Pour over 100g chopped chocolate. Let sit 1 minute, then whisk into smooth ganache. Let cool slightly.
- Pour ganache over mousse layer. Tilt pan gently to even it out. Chill for at least 6 hours or overnight.
- Unmold, garnish with crushed Oreos or toppings of choice. Slice with hot knife for clean layers. Serve chilled.
Notes
Nutrition
Why Oreo Mousse Cake Works for Every Occasion
Chocolate Desserts Made Easy
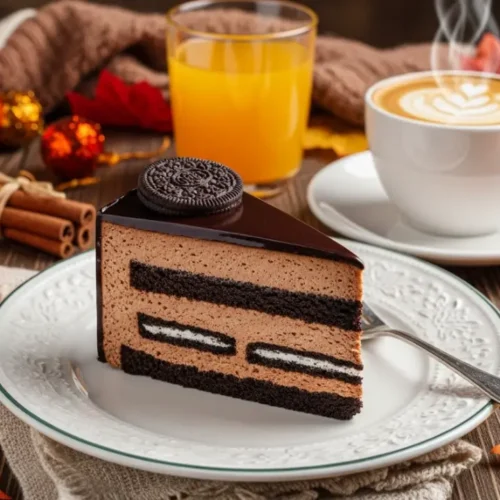
The best chocolate desserts are the ones that leave a mark—and this Oreo mousse cake fits the bill. No baking. No water baths. No complicated steps. Just three simple layers coming together to create something unforgettable. The mousse layer, in particular, hits that perfect midpoint between fluffy and fudgy. It’s smooth, dreamy, and anchored by the depth of melted dark chocolate. Unlike traditional mousse, which can be fussy, this version gets its stability from whipped cream and softened cream cheese, making it rich yet stable.

Many mousse cakes tend to lean either too sweet or too airy. What sets this one apart is balance. The base is a crunchy Oreo crust that’s sturdy enough to hold shape but melts in your mouth. The middle mousse layer carries that deep chocolate flavor, but it’s not overly dense. And the topping? A silky ganache that firms just enough to give you that clean slice but still melts as soon as it hits your tongue.
Whether you’re preparing for the holidays, a birthday, or a lazy Sunday treat, this cake adapts. Its flavors are universally loved, and it looks as elegant as a bakery masterpiece.
It’s the Ultimate No-Bake Cake
No-bake cakes are some of my favorites, not just because they’re fuss-free, but because they’re incredibly versatile. This Oreo mousse cake proves you don’t need a hot oven to make something luxurious. In fact, not using heat preserves the creamy textures and fresh flavor contrast. With no risk of overbaking, curdling, or cracking, it’s a foolproof option for beginners and pros alike.
Another advantage? You can make it a day ahead. The flavors deepen as it chills, and the texture becomes even more luscious. If you’re already a fan of easy Oreo cake recipes or looking for a stress-free dessert that looks impressive, you’ll be thrilled to have this on hand.
Breaking Down the 3 Irresistible Layers
Layer 1 – Oreo Cookie Crust
Start with the foundation: the crust. The base is made from crushed Oreo cookies combined with melted butter, forming a solid yet tender crust. You’ll need about 24 cookies—yes, filling and all—because that creamy center adds extra richness. Pulse them in a food processor until you get a fine crumb, then stir in the melted butter until evenly moistened. Press the mixture firmly into the bottom of a springform pan, making sure the surface is level.
Why this crust works: it’s chocolaty, slightly salty, and stands up well to the creamy layers above. It’s not just a base—it adds flavor and contrast to every bite. If you’ve ever made Oreo birthday cake ideas and struggled with crumbly bottoms, this crust will become your go-to.
Layer 2 – Chocolate Mousse with Cream Cheese
Here’s the star of the show: the mousse. This layer takes only five ingredients but delivers restaurant-quality flavor. Start by melting high-quality dark chocolate and letting it cool slightly. Meanwhile, whip heavy cream to stiff peaks in one bowl. In another, beat cream cheese, vanilla extract, and powdered sugar until smooth. Gently fold the cooled chocolate into the cream cheese, then fold in the whipped cream.
The result? A mousse that’s rich but not heavy, sweet but balanced, and stable enough to slice cleanly. It’s smooth, elegant, and deeply chocolaty. This layer will remind you of the filling in the most luxurious Oreo cake recipe homemade—but better.
Final Layer & Tips for Perfect Presentation
Layer 3 – Silky Chocolate Ganache
The final flourish is a glossy chocolate ganache poured over the chilled mousse. It’s made with just two ingredients: chocolate and heavy cream. Heat the cream until just simmering, pour it over chopped chocolate, let sit a minute, then whisk until smooth. Cool slightly, then pour over the mousse layer, letting it naturally settle into an even finish.
This layer elevates the dessert visually. It gives the cake that shiny, irresistible top you’d expect from a patisserie. You can garnish with crushed Oreos, mini cookies, or chocolate curls. For a fun twist, try adding peppermint oil to the ganache for a holiday spin.
Just like the Oreo cake filling we use in layered birthday cakes, this topping adds that final note of indulgence.
Presentation & Storage Tips
Use a springform pan for the cleanest release. Chill the cake for at least 6 hours, preferably overnight. When slicing, dip a sharp knife in hot water and wipe between cuts for perfect layers. Store the cake covered in the fridge for up to 5 days—it rarely lasts that long.
For a frozen variation, you can turn this into an icebox cake. Simply freeze and serve slightly thawed. Perfect for summer gatherings or prep-ahead occasions like potlucks or New Year’s Eve parties.
Creative Variations and Flavor Twists
Make It Festive: Oreo Holiday Mousse Cake
Want to turn this into a holiday dessert? Add a teaspoon of peppermint extract to the mousse and sprinkle crushed candy canes over the ganache. You now have a stunning Oreo peppermint mousse cake perfect for Christmas gatherings. It pairs beautifully with hot cocoa or mulled wine and gives off those cozy, festive vibes.
Or switch things up with red velvet Oreos or even golden Oreos for a vanilla-forward version. The beauty of this cake is its flexibility—you can create different versions without changing the core method.
If you love experimenting, check out other Christmas baked goods or festive desserts in our holiday collection.

Mini Oreo Mousse Cups
For a party-friendly option, make individual mousse cakes in jars or ramekins. Same layering concept, no slicing needed. These mini versions travel well and are perfect for holiday dessert tables or birthday goodie bags. You can even pipe whipped cream on top for extra flair.
And yes, they freeze beautifully. Just thaw in the fridge a few hours before serving.
FAQ: Oreo Mousse Cake
What’s the best way to crush Oreos for the crust?
Use a food processor for a uniform crumb. If you don’t have one, seal the cookies in a zip bag and crush them with a rolling pin.
Can I make this Oreo mousse cake ahead of time?
Yes! In fact, it tastes better when chilled overnight. You can make it up to two days in advance.
How do I prevent the mousse from becoming too soft?
Use heavy cream with at least 36% fat and whip it to stiff peaks. Chill the cake for at least 6 hours to firm up.
Can I freeze Oreo mousse cake?
Absolutely. Wrap it tightly in plastic and foil. Freeze for up to 1 month. Thaw in the fridge overnight before serving.
Conclusion
Oreo mousse cake is more than a dessert—it’s a statement. Whether you’re short on time or planning something unforgettable, this cake delivers in taste, texture, and elegance. With its three luscious layers, no-bake ease, and universal appeal, it’s sure to become a staple in your dessert rotation. From Oreo cake lovers to mousse enthusiasts, everyone will fall in love with this 3-layer chocolate dream.
Discover what’s cooking behind the scenes and beyond—find us on Facebook.