Tender Coconut Layers • Sweet Mango Filling • Whipped Cream Cheese Frosting • A Snowy Coconut Finish
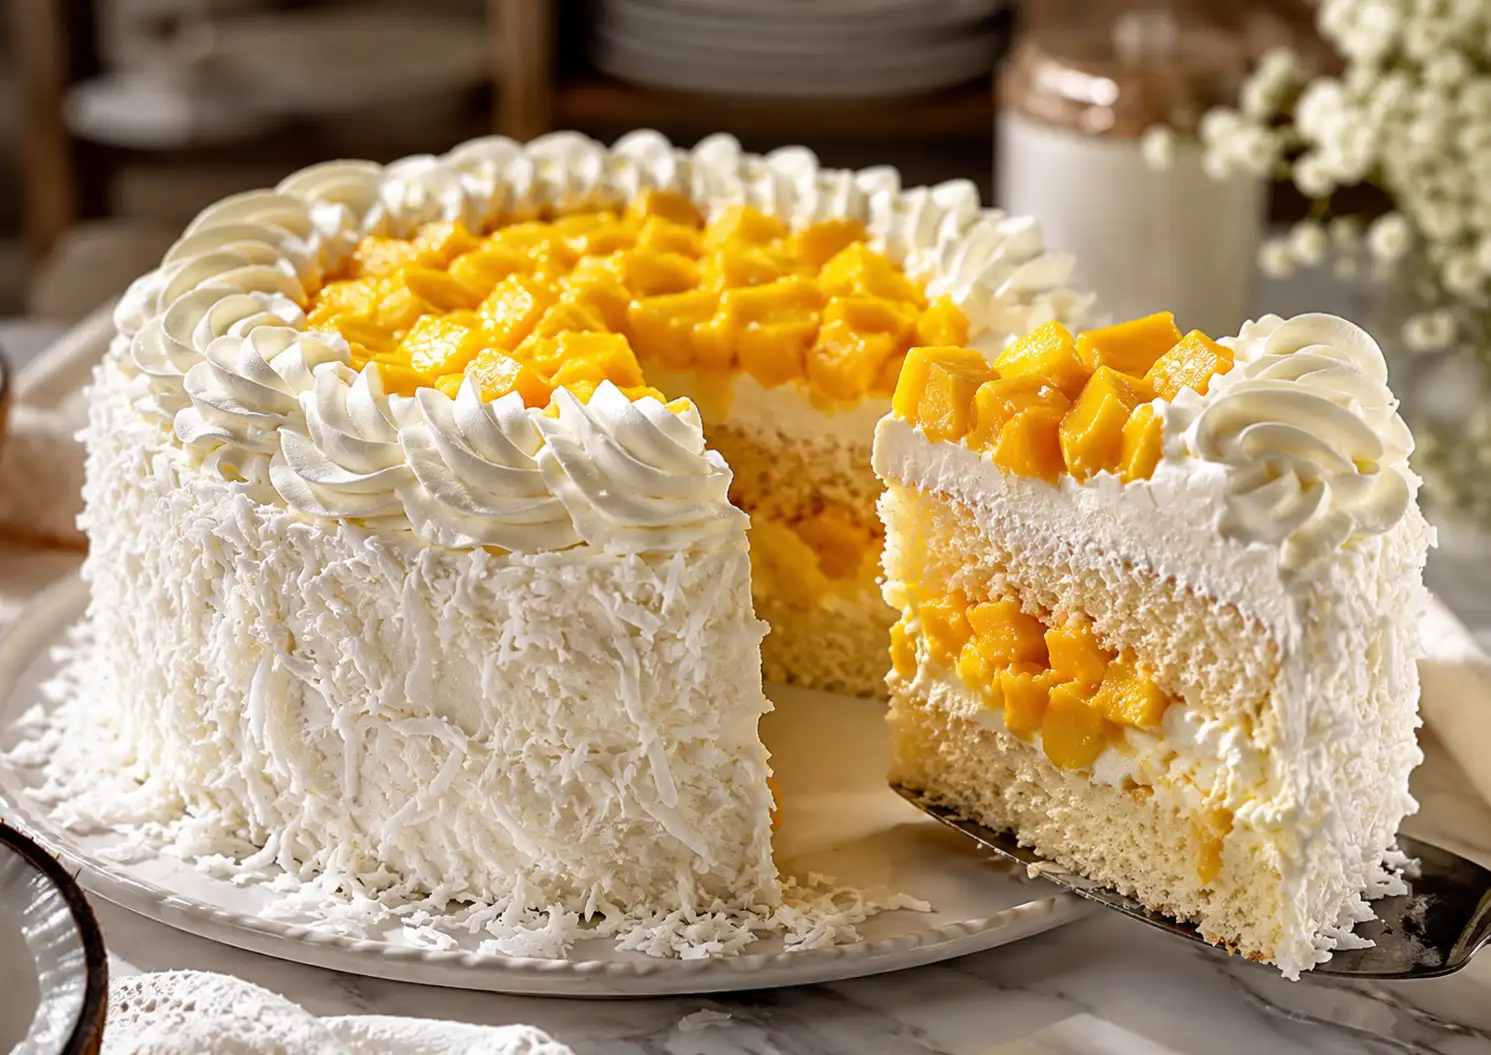
Mango coconut cream cake is the dessert that Nora Piket brings out when the season calls for something that feels celebratory without being complicated — a cake that looks beautiful on the table, tastes genuinely extraordinary in the bowl, and manages to feel simultaneously tropical and old-fashioned in the most appealing way imaginable. Soft coconut cake layers, a glossy mango filling, a whipped cream cheese frosting that is light and rich at the same time, and a generous coat of shredded coconut pressed against the sides that gives it that unmistakable, snowy, family-style finish. This is a cake for spring tables and summer birthdays and any Sunday that deserves something worth sitting down for.
The architecture of this mango coconut cream cake is straightforward and beautiful in equal measure. Two tender coconut cake layers, baked with coconut milk and desiccated coconut folded into the batter, sandwich a filling of diced ripe mango and mango puree cooked with lemon juice until glossy and slightly jammy. The whipped cream cheese frosting — cream cheese beaten smooth, folded with cold whipped cream into something light and stable that holds its shape without being stiff — covers the outside and fills the space between the layers alongside the mango. Fresh mango cubes crown the top. Shredded coconut covers the sides from base to frosting line.
Every slice reveals the layers: pale golden coconut sponge, white frosting, golden mango filling. It is one of those cakes that looks better cut than whole, which is a rare and valuable quality. Serve it cold. Wipe the knife between cuts. Put a spoonful of extra mango filling on the plate alongside each slice. This is exactly the kind of old-fashioned homemade dessert that gets remembered.
Table of Contents
Why This Mango Coconut Cream Cake Is Worth Making
- The combination of mango and coconut is one of the great tropical flavour pairings — bright, fragrant, sweet, and rich simultaneously. In this cake, neither dominates; they reinforce each other at every layer.
- Coconut milk in the batter produces a more tender, fragrant crumb than regular milk. The coconut flavour is baked into the structure of the cake itself, not just applied as a garnish.
- The mango filling is cooked and thickened with cornstarch — not a raw fruit layer, but a proper glossy filling that holds its position between the layers and slices cleanly without running out.
- The whipped cream cheese frosting uses cold heavy cream folded into beaten cream cheese — a method that produces a frosting that is simultaneously light like whipped cream and stable like cream cheese frosting. It holds its shape at refrigerator temperature and stays creamy on the plate.
- The coconut pressed onto the sides of the cake gives it the old-fashioned, family-style visual that makes it look like something from a mid-century bakery window and a grandmother’s kitchen at the same time.
- It can be made entirely ahead — the filling a day before, the cakes the day before, the frosting and assembly the morning of serving — with a 2 to 3 hour refrigerator chill ensuring everything is set and clean to slice.
Understanding the Four Components
The Coconut Cake Layers
These layers are built for tenderness and coconut flavour above all else. Coconut milk replaces regular milk entirely, providing a richer, more fragrant liquid base. Plain yogurt adds moisture and a subtle tang that balances the sweetness of the coconut. Vegetable oil rather than butter keeps the crumb tender and moist for days rather than hours — an important quality in a cake that may be assembled the day before serving. Desiccated or finely shredded coconut folded into the batter bakes into the crumb, creating a cake that tastes coconutty throughout rather than only on the surface.
The optional coconut extract — half a teaspoon — amplifies the coconut flavour significantly. If you want the coconut to be unmistakably present even in a cold, frosted slice, add it. If you prefer a subtler, more fragrant coconut note, leave it out. Both versions of the cake are excellent; the choice is a matter of preference and audience.
The Sweet Mango Filling
This is a proper cooked filling — not fresh sliced mango spread between the layers, which would weep and make the cake unstable, but diced mango and mango puree cooked together with sugar, lemon juice, and a cornstarch slurry until thick, glossy, and holding together as a proper layer. The combination of diced fruit and puree means the filling has both texture — identifiable pieces of mango in every forkful — and the glossy, jammy quality of a well-made fruit curd.
Allow the filling to cool completely before assembly. Warm filling placed on frosting will melt the cream cheese layer and create a structural problem that no amount of refrigeration will fully resolve. Make the filling first, always, and give it adequate time to cool to room temperature before it goes anywhere near the cake.
The Whipped Cream Cheese Frosting
This frosting uses a technique specific to whipped cream cheese frostings: the cream cheese is beaten separately until completely smooth, and the cold whipped cream is folded in — never beaten in, which would deflate it. The result is a frosting that has the stability of cream cheese (it holds its shape, it does not slide off the cake, it survives refrigeration for days) and the lightness of whipped cream (it is not dense or heavy on the palate, it does not feel like a wall of sugar).
Critical: the heavy cream must be cold when whipped. Warm cream does not whip to stiff peaks. Refrigerate the bowl and whisk attachment for 15 minutes before whipping if your kitchen is warm. And fold — never stir, never beat — the whipped cream into the cream cheese mixture. The fold is the technique; the air is the result.
The Coconut and Mango Decoration
The shredded coconut pressed gently onto the sides of the frosted cake is as functional as it is decorative. It provides a textural contrast to the smooth frosting and a visual definition between the white cake sides and whatever surface it is sitting on. Press it while the frosting is freshly applied — the coconut needs the tackiness of unset frosting to adhere. Fresh mango cubes on the top are the final statement: golden, fragrant, slightly wet at their cut surfaces, placed with some intention but not with architectural precision. This is an old-fashioned cake, not a modernist composition.
Ingredients
Serves 10–12 | Prep: 30 min | Bake: 25–30 min | Chill: 2–3 hours | Total: approx. 3 hrs 30 min
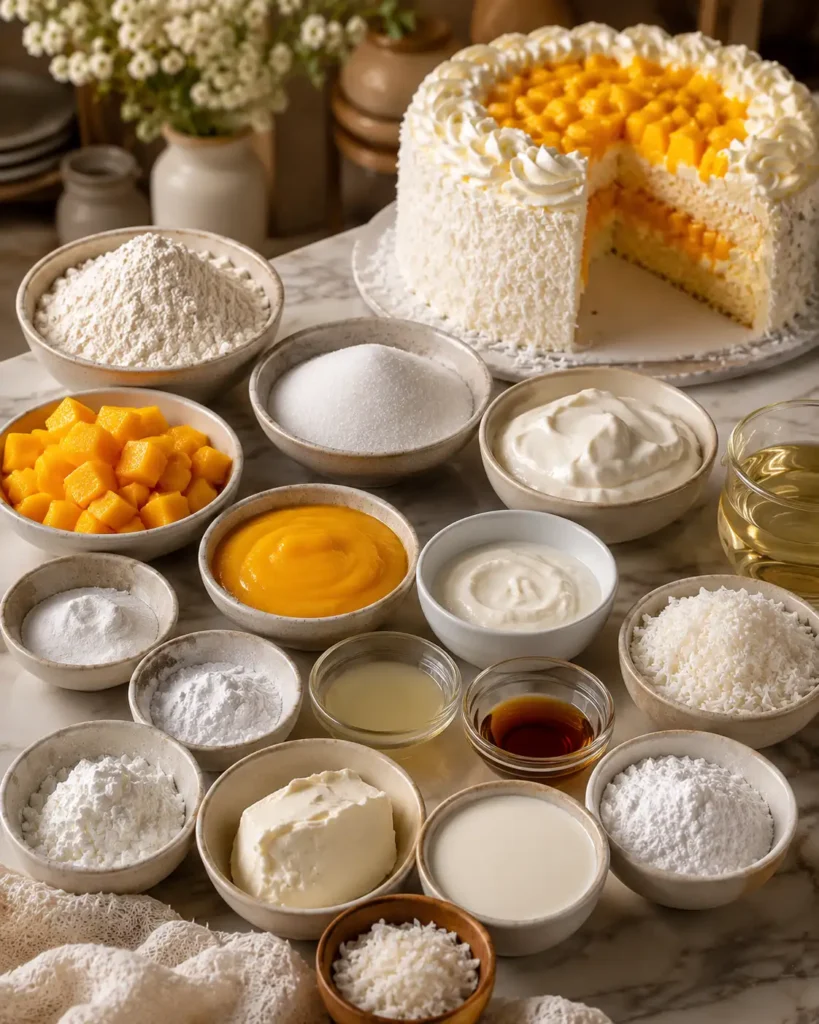
For the Coconut Cake Layers:
- 2 cups (250g) all-purpose flour
- 1 cup (200g) granulated sugar
- 1 cup (240ml) full-fat coconut milk — shaken well before measuring
- 1/2 cup (120g) plain yogurt — full-fat for maximum moisture
- 1/2 cup (120ml) vegetable oil
- 1/2 cup (45g) desiccated coconut or finely shredded coconut
- 2 teaspoons baking powder
- 1/2 teaspoon baking soda
- 1 teaspoon pure vanilla extract
- 1/2 teaspoon coconut extract — optional but recommended
- 1/4 teaspoon fine salt
For the Sweet Mango Filling:
- 2 cups ripe mango, diced small — about 2 medium mangoes
- 1/2 cup mango puree — blended fresh mango or store-bought
- 2 tablespoons granulated sugar — adjust based on mango sweetness
- 1 tablespoon fresh lemon juice
- 1 tablespoon cornstarch + 2 tablespoons cold water — mixed into a slurry
For the Whipped Cream Cheese Frosting:
- 8 oz (225g) full-fat cream cheese, softened to room temperature
- 1 1/2 cups (360ml) heavy whipping cream, cold
- 1/2 cup (60g) powdered sugar, sifted
- 1 teaspoon pure vanilla extract
- 1/2 teaspoon coconut extract — optional
For Decorating:
- 1 cup (90g) shredded coconut — for pressing onto the sides
- 1 cup fresh mango cubes — for the top
- Extra frosting piped around the top edge
- Optional: a spoonful of extra mango filling drizzled over the top mango cubes
How to Make the Mango Coconut Cream Cake — Step by Step
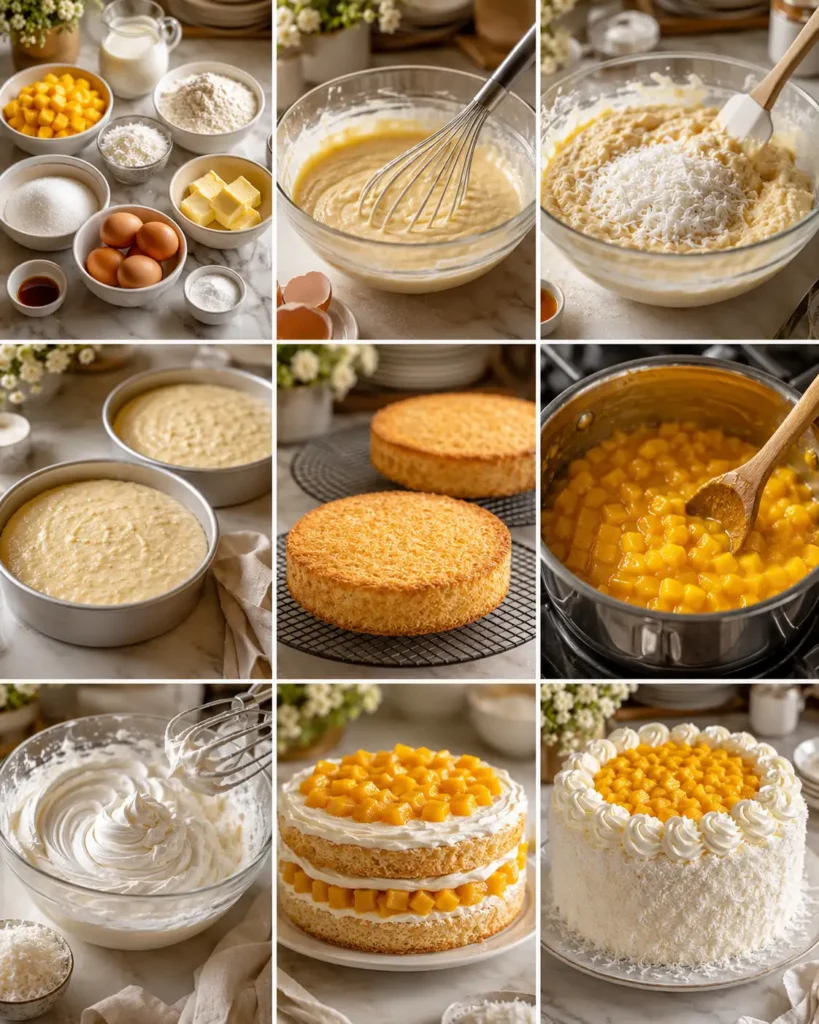
Step 1 — Make the Mango Filling First
Always begin with the filling so it has adequate time to cool. Combine the diced mango, mango puree, sugar, and lemon juice in a small saucepan over medium heat. Stir gently and cook for 3 to 4 minutes until the mango softens, the sugar dissolves, and the mixture becomes syrupy and slightly glossy. The aroma at this point — warm mango, lemon, and sugar — is one of the small pleasures of making this cake.
Stir the cornstarch slurry until fully dissolved (always mix cornstarch with cold water before adding to a hot mixture — adding it dry or in warm water causes lumping). Pour into the mango mixture and stir over medium heat for 1 to 2 minutes until the filling thickens to a glossy, jammy consistency that coats the spoon. Remove from heat and transfer to a bowl. Allow to cool completely at room temperature before refrigerating. The filling must be genuinely cold, not just cool, before it goes between the cake layers.
Step 2 — Bake the Coconut Cake Layers
Preheat the oven to 350°F (175°C). Grease two 8-inch round cake pans thoroughly and line the bases with circles of parchment paper. Grease the parchment as well.
In a large bowl, whisk together the yogurt, sugar, vegetable oil, coconut milk, vanilla extract, and coconut extract (if using) until completely smooth and unified — about 60 seconds of whisking. The coconut milk should be well shaken before measuring; it separates in the can and needs to be recombined. Add the flour, baking powder, baking soda, salt, and desiccated coconut. Switch to a rubber spatula and fold gently until just combined — no flour streaks, no overworking. The batter should be smooth but mixed with restraint.
Divide evenly between the two prepared pans. Tap each pan once or twice on the counter to release air bubbles. Bake at 350°F for 25 to 30 minutes until the tops are golden and a toothpick inserted in the centre comes out clean. The cakes should be beginning to pull away from the sides of the pan. Allow to cool in the pans for 10 minutes, then turn out onto wire racks to cool completely.
Step 3 — Make the Whipped Cream Cheese Frosting
In a large bowl, beat the room-temperature cream cheese with the sifted powdered sugar, vanilla extract, and coconut extract (if using) on medium speed for 2 to 3 minutes until completely smooth, light, and lump-free. Every lump in the cream cheese at this stage will remain in the final frosting. Take the time to beat it fully smooth.
In a separate bowl — ideally chilled in the refrigerator for 10 to 15 minutes beforehand — whip the cold heavy cream on medium-high speed until stiff peaks form. The cream should hold its shape firmly when the whisk is lifted. Do not overwhip to a grainy consistency.
Using a rubber spatula, fold the whipped cream into the cream cheese mixture in three additions — fold until each addition is mostly incorporated before adding the next. The fold should be slow and deliberate, scraping the bottom of the bowl and turning upward. Stop when the frosting is uniform, light, and fluffy. Refrigerate for 15 to 20 minutes if it seems too soft to spread — the chill will firm it slightly without stiffening it.
Step 4 — Assemble the Cake
Place one completely cooled coconut cake layer on a serving plate, cake board, or stand. Spread a generous, even layer of whipped cream cheese frosting over the surface — enough to create a proper layer, not a scraping. Spoon the cold mango filling into the centre of the frosted layer, spreading it evenly but keeping it slightly inside the edge of the frosting to prevent it from escaping at the sides when the second layer is placed on top.
Place the second cake layer on top and press very gently to anchor it. Apply a thin crumb coat of frosting all over the cake — a thin, even layer that seals the crumbs against the surface — and refrigerate for 15 minutes to set. This step is what produces a clean, crumb-free final coat of frosting.
After the crumb coat has set, apply the final, generous coat of whipped cream cheese frosting. Smooth the top and sides with an offset spatula, using long strokes to create a clean surface. The sides do not need to be perfectly smooth — the coconut coating will cover any imperfections.
Step 5 — Decorate
While the frosting is freshly applied and still tacky, press shredded coconut gently onto the sides of the cake. Cup a handful of coconut in your palm and press it against the frosted sides with a gentle, upward motion, rotating the cake as you go. The coconut should adhere readily to the fresh frosting and completely cover the sides from base to the top edge. Apply any remaining coconut to the outer edge of the top if desired.
Pipe a border of frosting around the top edge of the cake using a round or star tip, if you have a piping bag — or simply spoon small mounds of frosting around the perimeter. Fill the centre of the top with fresh mango cubes arranged generously and without excessive precision. Drizzle a small spoonful of the remaining mango filling over the mango cubes for a glossy, professional finish.
Step 6 — Chill and Serve
Refrigerate the assembled cake for a minimum of 2 to 3 hours before slicing. This chill time is what makes the difference between a cake that slides and a cake that holds — the frosting firms, the mango filling sets further, and the layers become a coherent, sliceable whole rather than components that shift under the knife.
Serve cold, directly from the refrigerator. Use a sharp knife dipped in warm water and wiped clean between each cut. Place a spoonful of extra mango filling on the plate alongside each slice for a richer, more abundant presentation. This is a cold cake, a proper cold cake, and it should arrive at the table that way.
Baker’s Notes — What Makes the Difference
Shake the coconut milk. Full-fat coconut milk separates in the can — the cream rises to the top, the liquid settles below. Shake the can vigorously before opening and measuring to reincorporate. Coconut milk measured from an unshaken can produces an uneven, separated batter.
Make the filling first, always. The mango filling needs time — first to cook, then to cool, then to refrigerate. Starting it after the cakes are baked and cooling almost always means rushing the assembly. Make it first, every time.
Do not overmix the batter. The coconut cake crumb is tender precisely because the batter is mixed minimally. Every extra fold after the flour disappears builds gluten and tightens the crumb. Stop the moment it is combined.
Cold cream for whipping. The heavy cream must be cold when it goes into the bowl. Warm cream does not whip to stable stiff peaks. If your kitchen is warm, chill the bowl and the cream in the refrigerator for 15 minutes before whipping.
Crumb coat before final frosting. The crumb coat — a thin layer of frosting applied and refrigerated before the final coat — is the technique that produces a clean, crumb-free exterior. It takes 15 minutes and the visual difference is dramatic. Do not skip it.
Press coconut while the frosting is fresh. Shredded coconut will not adhere to set, firmed frosting. Apply it immediately after the final coat goes on, while the frosting surface is still slightly tacky. Once the frosting has chilled, the window for coconut adhesion closes.
Chill fully before slicing. 2 hours minimum. 3 hours for a cleaner slice. Overnight for the absolute best result. The layers consolidate, the mango filling sets, the frosting firms, and the whole cake becomes structurally coherent. A warmer, under-chilled cake slides and crumbles at the first cut. Patience produces a beautiful slice.
Choosing and Preparing Your Mangoes
The mango filling is the centrepiece of this cake and its quality depends entirely on the quality of the fruit. A ripe, fragrant, deeply coloured mango produces a filling that is sweet, floral, and golden — extraordinary. An underripe, fibrous, pale mango produces a filling that is tart and flat, and no amount of added sugar fully compensates.
The best varieties for this recipe are Alphonso (the Indian mango season runs late spring to early summer — deeply fragrant, almost saffron-coloured flesh), Ataulfo or Honey mangoes (small, kidney-shaped, available in spring and summer at most supermarkets — smooth, fiberless, intensely sweet), or Kent mangoes (large, oval, sweet, available at most Asian grocery stores year-round).
A ripe mango should yield slightly to thumb pressure, smell deeply fruity at the stem end, and have skin that is beginning to show some give. If it smells like nothing at the stem end, it is not yet ripe. Place it in a paper bag at room temperature for 1 to 2 days to ripen fully before using.
For the puree component, you can blend fresh mango or use a good quality store-bought mango puree. Alphonso mango puree in cans, available at Indian and Asian grocery stores, is outstanding in this filling and produces a particularly deep golden colour and fragrant result.
Variations Worth Baking
Passion Fruit and Mango Filling: Replace 2 tablespoons of the mango puree with fresh passion fruit pulp (strained or unstrained depending on your preference for seeds). The passion fruit adds a sharp, floral tartness that cuts through the sweetness of the mango and creates a filling with extraordinary complexity. Particularly beautiful for a summer celebration cake.
Pineapple Coconut Cream Cake: Replace the mango filling entirely with a pineapple filling made using the same method — diced fresh pineapple, pineapple juice, sugar, lemon juice, and cornstarch. The pineapple-coconut combination is equally classic, slightly more tart, and particularly well suited to a winter table when fresh mango is out of season.
Lime Zest Coconut Layers: Add the zest of 2 limes to the cake batter along with the vanilla extract. The lime zest adds a sharp, aromatic citrus note to the coconut layers that complements the mango filling beautifully and makes the whole cake taste brighter and more vivid. Add lime juice to the frosting in place of (or alongside) the vanilla.
Toasted Coconut Finish: Toast the shredded coconut for the sides and top in a dry skillet over medium heat or in a 325°F oven for 5 to 7 minutes, stirring frequently, until golden and fragrant. Allow to cool completely before applying. The toasted coconut version of this cake has a deeper, nuttier exterior and a more autumnal quality — outstanding for a September or October celebration.
Mini Mango Coconut Layer Cakes: Bake the batter in four 6-inch round pans instead of two 8-inch pans. Stack in pairs for 4 individual two-layer mini cakes. Reduce the baking time to 20 to 22 minutes. Each mini cake is individually frosted, coconut-coated, and topped — spectacular for a birthday where every guest deserves their own perfect cake.
How to Serve the Mango Coconut Cream Cake
- Cold from the refrigerator, sliced with a warm wiped knife — the definitive and correct way
- With an extra spoonful of mango filling on the plate alongside each slice — as the recipe itself suggests, and rightly so
- As a celebration centrepiece — on a white cake stand, the coconut sides and mango-topped crown visible from across the room
- At a birthday table where it replaces a standard birthday cake entirely and earns more compliments
- At a spring or summer gathering where the table has flowers and good fruit and this cake fits perfectly
- The following day, cold and well-set from an overnight refrigerator rest — arguably even better than the day it was made
Storage
Store the mango coconut cream cake, covered, in the refrigerator for up to 4 days. The cream cheese frosting requires refrigeration — do not store at room temperature for extended periods. The cake improves over the first 24 hours as the mango flavour permeates the frosting and the layers settle into each other fully.
Make-ahead options: the mango filling can be made up to 2 days ahead and refrigerated in an airtight container. The cake layers can be baked, cooled, wrapped in plastic wrap, and stored at room temperature for up to 1 day, or refrigerated for up to 2 days before assembly. The frosting is best made on the day of assembly for maximum lightness. Assemble and chill at least 3 hours before serving.
Do not freeze the assembled cake — the whipped cream cheese frosting does not freeze well, and the mango filling loses its texture on thawing. Freeze individual unfrosted cake layers only, wrapped tightly, for up to 1 month.
Why This Belongs in Seasonal Joy
Seasonal Joy, as a collection, has always celebrated the desserts that belong to a specific kind of table — the ones that make the occasion feel elevated without making the baker feel anxious. The Karpatka belongs to winter celebrations. The lemon coconut loaf belongs to any quiet Sunday. The cream cheese lemonade pie belongs to summer afternoons. And this mango coconut cream cake belongs, with complete conviction, to the season when mangoes are ripe and fragrant and the best possible thing you can do with them is put them in a cake this good.
It is old-fashioned in structure and thoroughly of its season in flavour. It looks the way a homemade cake should look — generous, coconut-covered, topped with fresh fruit, unashamedly pretty. It tastes the way a homemade cake should taste — layers of distinct, complementary flavours that make sense together and improve with each bite.
Nora Piket makes this cake for the tables that deserve something genuinely special. It always earns its place.
A Final Word from the Seasonal Joy Kitchen
There will be a moment, after the cake has chilled and been lifted from the refrigerator onto the table, when someone looks at it — the coconut sides, the mango crown, the frosting visible at the cut edge if you have already sliced it — and asks what occasion it is for. The correct answer is: the occasion is this, right here, which is reason enough.
Cut it cold. Wipe the knife. Put the extra mango filling on the plate. Watch what happens when the fork goes through all the layers at once — coconut cake, cream cheese frosting, mango filling, coconut cake — and everything arrives together in one cold, creamy, tropical forkful.
This is a cake that gets remembered. Make it for the people who deserve to remember it.
More seasonal recipes worth savoring — timeless family classics, grandmother’s kitchen secrets, and Nora Piket’s own take on the desserts that define every season. Follow us on AstroRecipes and never miss a recipe.
Recipes I Think You’ll Love